A starting point in your journey towards a remotely connected network of devices and applications on edge is provisioning and onboarding of new devices to your system. This includes:
- Creating and installing device images
- Persisting device data to the database
- Defining secure device policies
- Implementing reliable backend systems for device management
Preparing a device
It is close to a 100% chance that your devices require the Linux operating system. This one has been there for quite a while and has a proven track record in number of installations on embedded or regular server systems throughout majority of industry verticals.
The Linux operating system is stable and flexible, providing us with plenty of customization possibilities. While these are nice to have, not everyone should start building their own platform from scratch. And no one should leave their devices unsecured and open out in the wild. In order to make sure the service runs smoothly, there’s quite a few tasks that need to be done, per device, programatically. You need to:
- Choose your device’s operating system
- Use embedded OS toolkits to build the image
- Provision the device with a newly created image
- Install your software to the device
Let's now create a fully working PoC environment where we'll be able to manage our device remotely.
We need to choose the image we will install on one of the most popular SoC boards out there: Raspberry Pi 3. Instead of creating our own image with SDKs such as Yocto, for this tutorial we will use the officially created Raspberry Pi image located here.
For our application code we will use Node.js and the rpc-websockets messaging library on both our device and server.
Download image and install it on your SD card:
$ wget https://downloads.raspberrypi.org/raspios_lite_armhf/images/raspios_lite_armhf-2020-08-24/2020-08-20-raspios-buster-armhf-lite.zip
$ unzip 2020-08-20-raspios-buster-armhf-lite.zip
$ dd bs=4m if=2020-08-20-raspios-buster-armhf-lite.img of=/dev/mmcblk0 conv=fsync
You will now be able to boot your device with Raspbian OS, which uses the Debian Buster distribution release underneath. But before actually being able to SSH into your device to do further setup, you need to enable the sshd service by mounting the image on your workstation and creating the `ssh` file in root directory:
$ cd /path/to/sd/volume
touch ssh
Unmount your SD card and insert it into your Raspberry Pi. Once booted, you will be able to access your board via SSH (in this example, we're using an IP address "192.168.88.131"). Use default Raspbian credentials to login:
$ ssh [email protected]Install the application stack:
$ sudo apt update
$ sudo apt install nodejs npm --yes
$ mkdir device && cd device
$ npm init --yes
$ npm install --save rpc-websockets
We're now ready to create a simple client application which will run on our device and will connect to a remote server (running on our workstation for this tutorial). Create a new file in your project called "app.js" and add the following code:
const WebSocket = require("rpc-websockets").Client

const client = new WebSocket("ws://192.168.88.1:3333")

client.on("open", function() {
  client.subscribe("reboot")

  client.on("reboot", function() {
    client.close()
    process.reboot()
  })
})
Since we haven't built our server app yet (which will run on IP address "192.168.88.1" and port "3333"), we cannot run this code on our device, since we have nothing to connect to. Let's create a simple server app that will send a "reboot" action to our device when it gets connected to the server:
const WebSocketServer = require("rpc-websockets").Server

const server = new WebSocketServer({
  port: 3333,
  host: "192.168.88.1"
})

server.event("reboot")

server.on("connection", function() {
  setTimeout(function() {
    server.emit("reboot")
  }, 2000)
})
Fire up your server and run the device app:
$ node app.jsYour device should now receive a defined action from the server. This was just an example of how you can start building your own solution for your gateway device management. There's quite a lot of work to do aside from the application itself, like the preparation of custom secure device images, ensuring a safe and stable application runtime and layering of modular application actions that serve certain business needs you might have.
To ease off this burden from our customers, Edgebind takes care of these tasks by providing an easy and intuitive onboarding user interface that prepares the device according to customer’s specifications. Customers are able to choose between importing their existing devices and buying a device delivered to their premises physically once fully prepared for Zero Touch Provisioning.
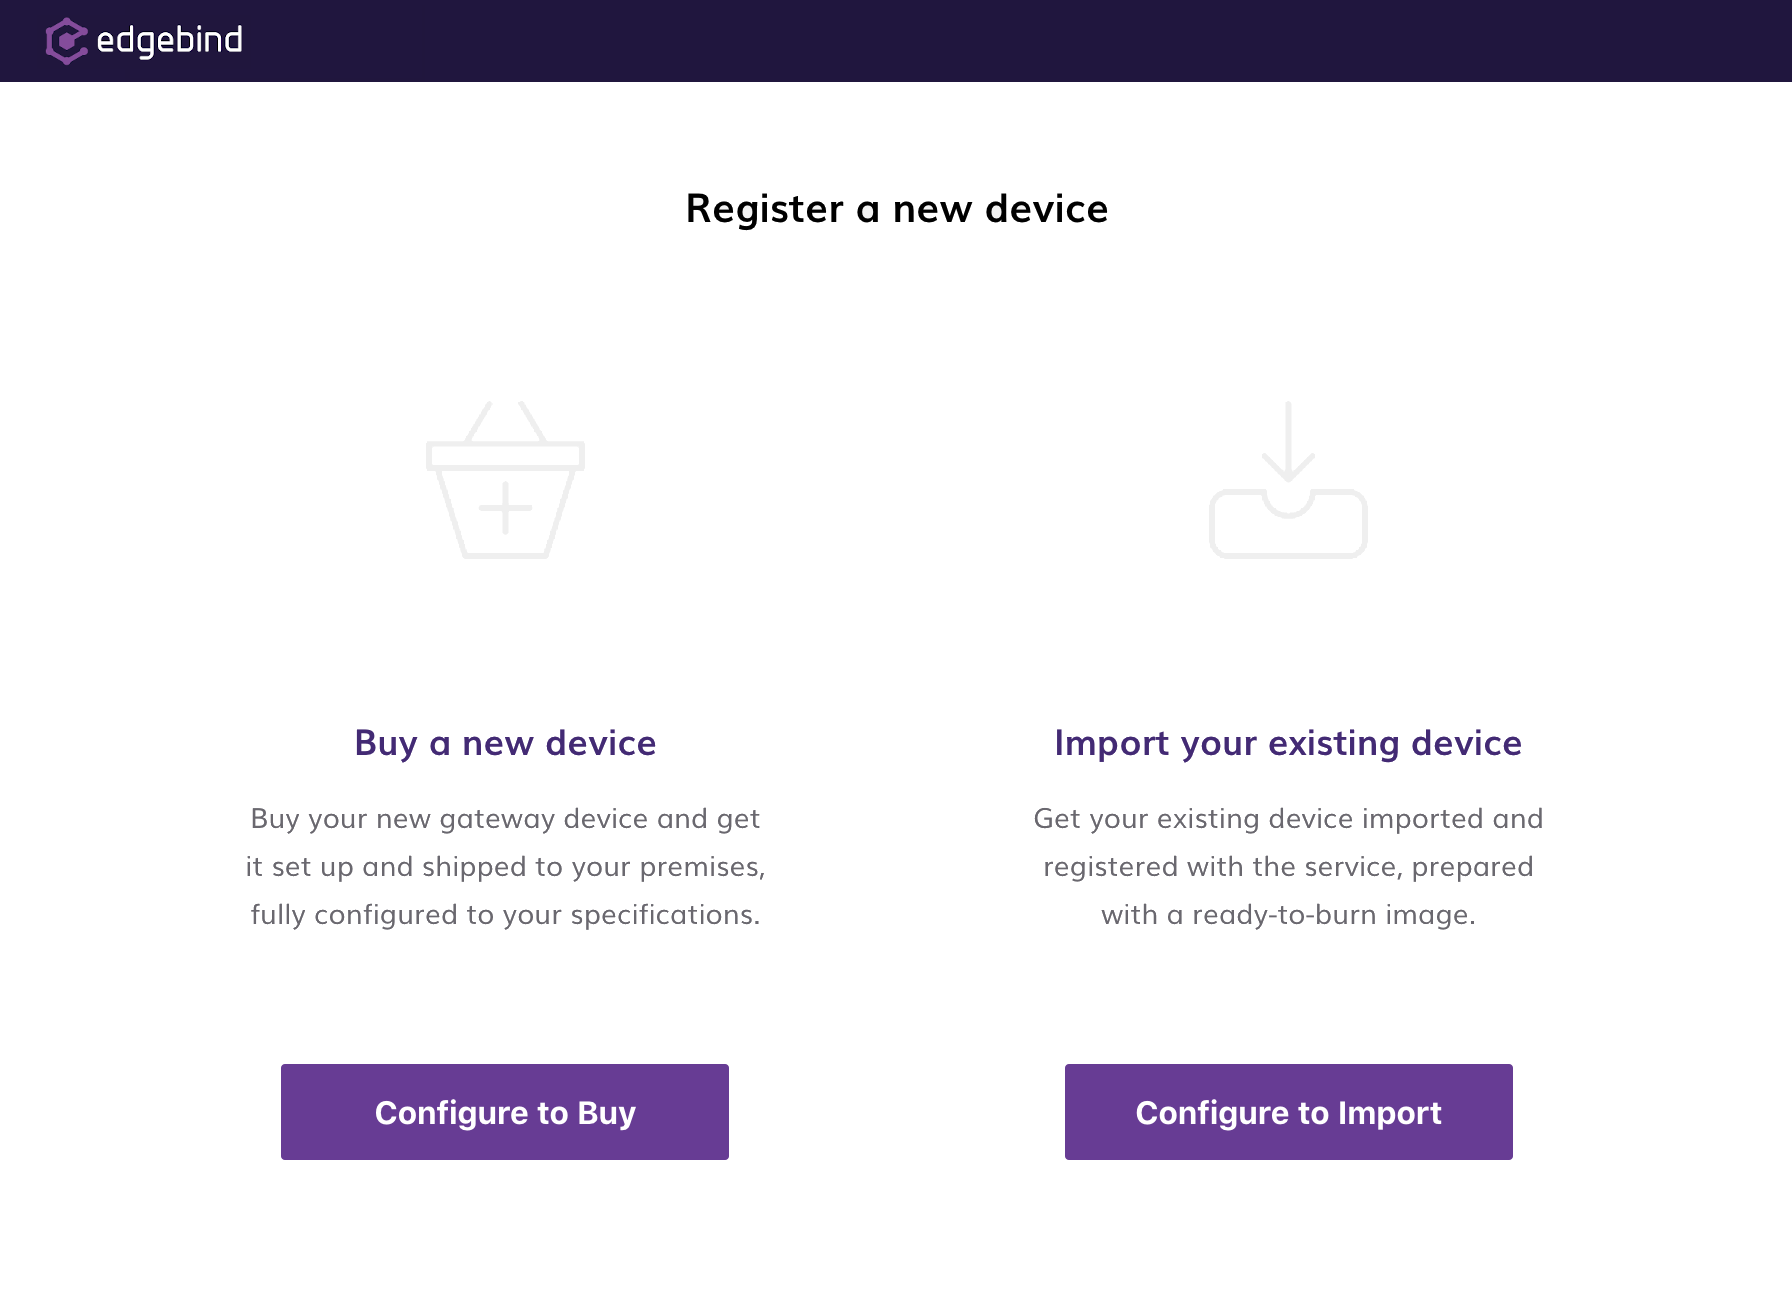
Edgebind's onboarding user interface.
Own your device data
Each of your devices need to have a single source of truth, a description or a model which tightly defines their board type and what settings they prefer. A model instance is most usually stored in a database. This database needs to be safely and reliably deployed so that it’s highly available for both you as an administrator and your devices that constantly store and fetch data from it.
There are many choices to make when implementing such a system. SQL or NoSQL types of databases, TLS communication channels and database modeling are just some of them.
Our platform stores all device data in secure and highly available database instances, decoupled from both device and backend systems to ensure scalability and reliability.
The Principle of Least Privilege

No trespassing. Photo by C Scott Webb on Unsplash.
Once your devices are deployed and provisioned on remote locations they establish persistent connections towards our backend systems. Devices are able to consume data you manage and notify our systems on events you can act on via our platform.
Even though they were successfully authenticated, that does not mean they should be authorized to access all platform resources without limits. Allowing your devices (or any entity on the internet, actually) to have full access to domains other than their own ones imposes serious security risks.
Upon provisioning, your devices are authorized to access all resources they need to fully operate out on the field by using a well known principle of least privilege. This increases security standards implemented throughout the service you operate on. This essentially means that each of your devices are completely isolated from each other, so that, in the event of a security breach on a remote site, there's no possibilities of compromising your entire fleet just because one of your devices was left unattended.